
Do you have Cassava growing in your garden? Well, you should.
Cassava has the highest amount of starch in a root vegetable (yes, more than potatoes) and it is one of the most popular starch the world-over in locations like East and West Africa, and parts of South East Asia.
It is growing in popularity in Hawaii as an easy-to-grow vegetable with several uses.
After harvesting cassava, the root may have a short shelf-life, therefore, it’s advised to only dig it up when you’re ready to cook it. It can safely stay in the ground for up to a year after it is ready for harvesting.
There are some delicious ways to eat cassava – everything from savory to sweet. Read on for recipes to make your own cassava chips or a twist on the traditional Filipino cassava cake, but before we get into recipes, how do we harvest it?.
How to Harvest Cassava

By hand
Cassava is best harvested by hand in small backyard gardens. You can excavate the soil by hand or use a small shovel to uncover the roots, being careful not to cause any damage.
Tools:
You will need a hoe or shovel and turn up the ground around the stem of the cassava plant until you locate the long, woody root. This is the edible part that you will harvest. It can be very long (up to 3 feet!) so keep digging to find the entire root before you sever it from the base of the plant.
Reserving the stem:
It’s essential that you save the stem of the plant, for your next cassava crop. When you harvest cassava, set aside the long stem, do not destroy it when you harvest the roots.
When to harvest
There are two methods for determining when cassava is ready to harvest – based on timing on when leaves drop. Finally, you can also delay harvesting, using it as a natural method to store and keep cassava fresh until you want to use it.
Timing
Cassava roots should be ready to harvest between 9 and 12 months after planting. The plant will be quite tall at this point (sometimes over 10 feet high). You could just time 1 year from when you planted your cuttings and know that your cassava root will be ready for harvest.
Based on leaves
Another way to determine when cassava is ready to harvest is by paying attention to the leaves: they will turn yellow and drop off on their own when the root is ready to harvest.
Delay Harvesting
The approach I like the best, however, is delayed harvesting. The cassava root vegetable will stay fresh in the ground for months – even up to 12 months – after it has ripened, there is really no need to rush to harvest it.
Keeping it in the ground, until you’re ready to cook it is the easiest approach. This means you don’t need to harvest your crop all at once; just harvest one or two massive roots when you want to use them.
Your Next Cassava Crop

In order to ensure another crop a year’s time, now would be the time to replant the cassava stems you got while harvesting the roots in a NEW bed.
Set aside the long, central stem of the cassava plant and measure out 14-inch sections. Each section of stem should include 2 ‘nodes’ (natural vertical markers on the plant).
You do not need to plant sections with leaves.
Use sharp pruning shears to make angled cuts (do not do straight across or rough cuts that break the stem).
Now, each of these sections can be planted directly in your garden or field. I suggest planting on a slant in small mounds, this can help prevent them from getting flooded if you plant during the rainy season.
For more tips for planting your cassava (including preventing pests), check out my post.
Processing Cassava
Short shelf life
Cassava doesn’t have a long shelf-life like potatoes.
You can only keep the harvested roots in a cool, dry store for about 6-7 days before the root will start to shirvel and get hard, or show signs of rotting (either is unpleasant and usually means you cannot use the cassava for food anymore).
Delay Harvesting for up to 1 year to keep it fresh
Hopefully, you’ve delayed harvesting until you’re ready to process and cook the cassava. Just in case you didn’t, and you need to keep the harvested cassava for some days, don’t remove the dirt from around the root.
Keep it nice and coated in earth until you’re about to cut and peel it.
Honestly – I don’t remove that much dirt before cutting it up, either. I just peel off the outer ‘bark’ or woody skin.
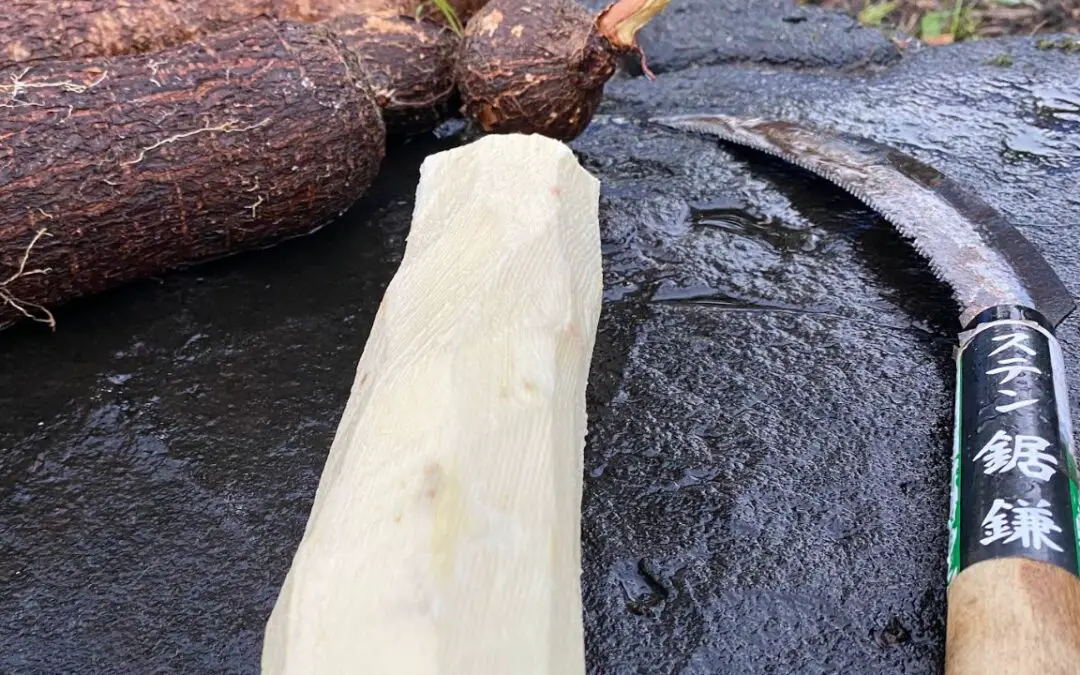
Peeling Cassava
The skin of the cassava root is very thick and woody, so you will need to use a large, sharp knife to cut through, until you reach the firm white flesh inside of the root. No little paring knife for this job, the skin is too thick!
Tip: Make a long, vertical cut and you may have an easier time peeling off the ‘bark’ around the entire root.
Once you’ve removed the bark, cut up the pieces of cassava root much like you would a potato and put in in a pot of water (you might need to rinse the pieces if there is a bit of residual dirt on them).
Now, you can begin preparing your cassava. You can fry, boil or grate the pieces for use.
Cooking Cassava
Here is the fun part: you get to cook (or bake) your cassava.
Cassava Chips
Thinly slice cassava rounds and fry in oil for homemade chips (I find they have a bigger crunch than regular potato chips – sprinkle with a bit of cumin or paprika and salt for a savory snack).
Fried Cassava Chunks
You can also make a traditional East African snack known as “Muhogo” by deep-frying cassava cubes and dipping in a tangy tomato-garlic-chili sauce.
A bit healthier option is to partially boil the cassava cubes first, then do a shallow fry in oil to make them crispy.
The sauce is simply:
2 freshly pureed tomatoes (remove the skins, first)
1 or 2 cloves of finely minced garlic
a sprinkle of salt
squeeze of lemon
And whatever amount of spice you want in the form of diced chiles or just a bit of dried chili seasoning.
Mashed Cassava
Mashed cassava is pretty much what it sounds like: boil and mash cassava.
It’s made a little differently than mashed potatoes on two fronts:
1) you’ll need to remove the fibrous middle section of the root before mashing. You could cut it out and not boil it at all, but I find it easier to chop up the cassava, boil it, and then the fibrous part easily stands out and you can just separate it and remove it with a fork.
2) since the texture of cassava is a bit more starchy than potatoes, I usually make a vegan-friendly cassava mash with just a bit of the reserved water used to the boil the cassava. No milk, no butter, just a bit of starchy water and salt.
It is a nice side dish to have along with a flavorful stew, fried chicken or cooked greens.
Cassava Cake
This is a traditional Filipino dessert, made just a little bit easier. It uses tropical ingredients like coconut, and comes out as a creamy type of cooked pudding, not really a fluffy cake. It’s delicious – just sprinkle a bit of nutmeg or cinnamon on top before serving.
You can find recipes online, but the majority call for:
Freshly grated cassava
Coconut milk
Grated coconuts
Eggs
Evaportated Milk
Note: Raw cassava has trace amounts of cyanide in it. Never eat raw cassava. Whether you’re frying, boiling or baking it, you must cook it in some form before eating!
Make Your Own Cassava Flour
You can also make your own cassava flour (a gluten-free alternative) from your cassava roots. This is one way to preserve the cassava long-term, too.
- First, peel your cassava and grate up the white starchy root.
- Then, remove excess moisture by tying up the grated cassava in a cheese cloth or thin kitchen town and wringing it out.
- Dry it: Place the grated pieces in a warm, sunny spot to dry over 2 days.
Don’t go longer than 72 hours for drying, otherwise the cassava pieces might begin to go bad.
You can also dry cassava out in an oven- spread on a baking sheet and put your oven on the lowest setting with the oven door cracked open for about 2 hours.
Or, use a food dehydrator to get your grated cassava dry.
- Then, throw all the dried, grated pieces into a powerful blender and blend as well as you can. If you want, pass the flour through a sieve to separate any large chunks that didn’t grind up.
Make sure to store your cassava flour in an air-tight container, because any moisture that gets in can ruin it.
The process takes a while (up to 4 days if you are drying by the sun), but it’s the best way to preserve cassava long-term.