
I believe that rainwater harvesting is a good solution for everyone, not just those going off-grid. If you have a home and land, you can and should harvest rainwater. One of my former jobs was to install rain tanks and I never met one client who was unhappy about installing a system.
The average homeowner can expect to pay roughly $1 per gallon of water saved for a Rainwater Harvesting System. This price includes labor and materials such as foundation, tank, downspouts, diverters, overflow pipes and filters.
The cost of each system depends on how your home is already set up and the number of renovations or landscaping changes required to implement a given rainwater harvesting system.
Consider your home and your personal water needs to choose the type of rainwater harvesting system that is best for your off-grid home.

Related Costs For Rainwater Tank Installation
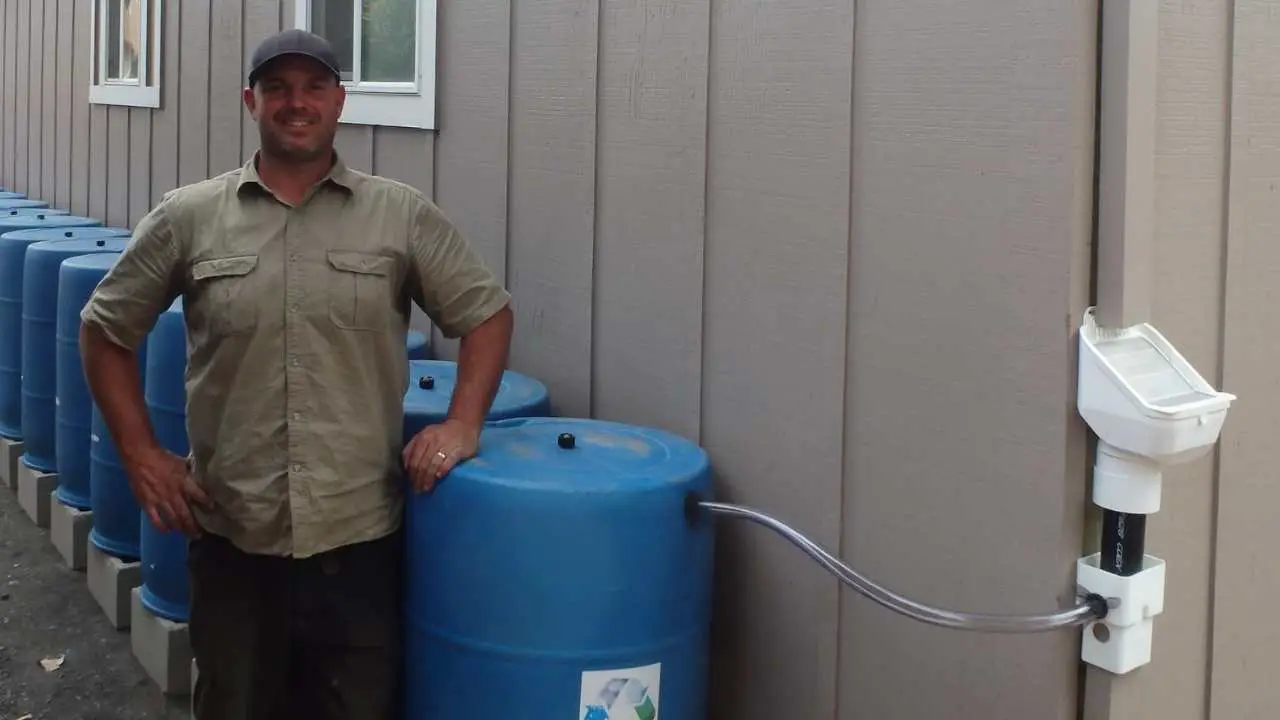
Let’s go over the cost of installing a Rainwater Harvesting tank that catches and stores runoff water from the roof of your home. We will cover everything from the gutters to the pump.
You just have to be sure your roof is equipped with galvanized metal roofing or something similar that is approved for rainwater harvesting. Roofs made from harmful materials such as asphalt should not be used for rainwater harvesting purposes.
The costs described below are estimates. In the post-Covid economy, prices are fluctuating all the time. This article will give you a general idea of what a rainwater harvesting system will cost you.
1. Gutters
Most homes have gutters, but if yours does not, it is important to install them onto the eaves of your home.
When choosing gutters you have 3 main styles to choose from. I prefer the zero seam, rolled galvanized metal gutters over vinyl gutters. Copper gutters are just too darn expensive at around $60 per foot!
Vinyl gutters are flimsy and have way too many spots where water can build up and create algae growth. The seamless gutters allow water to flow uninterrupted into the downspout.
I recently had seamless gutters installed on a home for my mom here in Hawaii that I built for her. It came out to about $15 per foot. The national average ranges from $8 to $30 per foot.
What the vinyl gutters has over the others though is price. The average price for these gutters is about $4 to $8 per foot, making them a great option for those on a budget. Even though they’re not the best, at least you’re harvesting water!
Cost Summary:
Vinyl Gutters – $4 to $8 per foot
Seamless Metal Gutters – $8 to $30
Copper Gutters – $60+
2. Gutter Leaf Guards
The next question is whether or not to install leaf guards in your gutters. If your gutters are low enough and easy to manage, I’d say go without them, they can be more of a pain than their worth.
If you have a two story home or just a high roof, you have to judge whether or not there is enough potential leaf fall to be even causing a problem. If there is, then getting a good leaf guard could save you time before having to get up there and clean it by hand.
I’ve tried out a few leaf guards and have found this one to work the best at a low price. You can install them yourself, they shed leaves off pretty well and they are holding up pretty well.
Others I have had in the past were annoying to install and remove and kind of fell apart after a short time.
I have always wanted to try the gutter system by Leafguard. It is a gutter and gutter guard rolled into one. The claim is they take next to no maintenance. That’s a pretty nice feature. Even with a gutter guard, I still clean my gutters at least twice per year.
Cost Summary:
Gutter Guards – $0.70 per foot
LeafGuard Gutter System – $20 – $30 per foot.
3. Downspouts
There are as many downspout options as there are homeowners, so it’s best to choose what fits the aesthetic of your home. The downspout can always tie into a 3” pipe located underground which leads from the home to the water storage tank.
This would be considered a wet system because there would always be water in the part of the pipe that is in the ground. This system is best in wet climates where the water can flush through constantly.
If you are in a dry climate, it would be best for the lowest part of the pipe to have a relief valve so it could be drained between long breaks of rain.
Or you can install a “dry” system that directs water directly from the gutter to the water tank by keeping the inlet pipe above the top level of the tank. In this system, no water ever stays in the line.
One accessory you may want to add to the system is a Leaf Diverter for the downspout. A Leaf Diverter is a very effective way to shed leaves and debris before it enters your water storage tank.
Cost Summary:
Downspouts – Varies $3 to $40 per foot, depending on the style
Leaf Diverter for Downspout – $50
Pipes and Fittings from Gutter to Tank – $3 -$5 per foot
Related: 5 Advantages & Disadvantages of Harvesting Rainwater
4. First Flush Diverter
The first ‘wash’ of water off your roof is going to have lots of dust and other contaminants in it. That’s why you need to set up a “first flush” system to avoid taking in the first rain that comes off your roof.
A first flush diverter channels the first flow of rain into an auxiliary 6” pipe that runs vertical, parallel to the gutter. The bottom of the pipe is fitted with a drain valve. Inside of the pipe, there is a rubber ball that blocks the inlet when full, causing the water to go back into the water storage tank.
You can see what I mean by checking out this First Flush Diverter on Amazon.
It is an effective system, as long as it is managed properly. However, at a past meeting I attended put on by ARCSA, they said that studies were showing that first flush systems were actually a waste of money and time because most owners did not manage it properly.
I’ll let you be the judge.
Cost Summary:
First Flush Diverter System – $100-$300
5. Water Tank Foundation
Before installing a water tank, you will need to construct a foundation. This can vary from concrete blocks, tamped down base rock to a concrete pad.
The type of foundation you get will be based upon what type of water tank you get. Each water tank will have specific guidelines from the manufacturer on what type of foundation to install.
Because of the variabilities involved with what type of foundation is needed, it is hard to estimate a cost for this step of the process. You will have to either get a quote from your local rock yard on the cost of materials or a quote from a contractor for installation.
I just want you to be aware of all potential costs.
Cost Summary:
Water Tank Foundation (Varies)
6. Water Storage Tanks
The type of tank you need will depend on your available space and budget. For urban applications you may want to go with a smaller tank option such as a BlueBarrel or Slimline tank.
For those more worried about style, you can build a ferrocement tank or install a sleek galvanized tank. Below are some of the water storage tank options that you can choose from.

- Bushman Tanks – These are high-quality, round tanks that are built for hot climates. They are fully enclosed from the outside elements, helping minimize habitat for breeding insects.
They range in size from a couple of hundred gallons to 10,000 gallons.
Prices vary from $1 to $2 per gallon of storage
- Slimline Tanks – Bushman also makes a slimline style of tank ideal for smaller properties or to position your tanks in a narrow outdoor space.
Due to their specialized design, they tend to cost more per gallon than their round counterparts
$3 to $4 per gallon of storage.
- Ferrocement – Ferrocement tanks are reinforced cement tanks, with a metal ‘cage’ inside, which gives them their shape and strength. In fact, they can be molded into almost any shape you like. I’ve seen ferrocement tanks look like giant vases, large boulders doubling as a waterfall, as well as your run of the mill round tank.
The thing with ferrocement is that these tanks last almost indefinitely with very little maintenance. Unfortunately, they also cost a lot. You can DIY, but still, concrete prices are high these days.
$5 to $8 per gallon of storage.
- BlueBarrels – A cheap option, with no limit to the number of additional links in your “barrel chain” for storing water, as long as you have enough space and don’t mind a line of water tanks in your backyard.
This system is one of the cheapest ways to get started harvesting rainwater, especially if you are just harvesting a small amount.
$1 per gallon of Storage.
- Galvanized metal with vinyl liners – These tanks are some of the most economical tanks out there in relation to their longevity, but they are definitely not the best looking.
The outside metal will last a long time, it’s the inner liner that will need attention, long before the outer metal.
Here in Hawaii, these are the standard water tank you will find at most homes. The bushman tanks are much more costly here. I think it has to do with shipping materials. You can ship a galvanized tank in pieces, a bushman tank has to be shipped as-is and takes up tons of room in the process.
$1 to $2 per gallon of storage

- Intex swimming pool – This is the cheapest and most basic option, but you have to manage it. If you leave it uncovered, insects and algae will grow quickly. You’ll either have to manage with chemicals on a regular basis or should invest in a pool cover.
$240 for a pool that holds 1700 gallons of water, now that’s the best bang for your buck!!
- Underground Tanks – Underground tanks are a great way to harvest rainwater without having to look at them all the time. Buried underground, you no longer have to worry about how it looks or how much space it will take up.
You’ll likely need to rent equipment or hire professionals to install an underground water tank, which can be costly. If you have the money, it could be a great way to store rainwater that is out of sight.
I installed one on a project in Malibu years back. It was a pretty simple process. The hole was dug with a backhoe, the tank was delivered and put into place by the same backhoe.
It took 2 of us to get it installed and it was a fairly straightforward process, but expenses did add up. But for a 10,000 gallon water tank buried underground for a grand total of $12k, it wasn’t too far off the mark from other tank solutions.
$1.50 to $4 per gallon of storage, depending on the tank.
- Bladders – I put this one last for a reason. I don’t particularly like bladders for rainwater storage. They are on the expensive side and can potentially cause structural damage to your home or porch if the bladder expands too much.
The reason people would want to install a bladder is that they are trying to creatively use space to install their water storage tank. The only problem is, there are a lot of bad reviews out there in regards to these bladders.
I was asked to install a bladder once on a home in California and after looking deeper into what they entailed, we decided that a bladder would not be a good option. The cost to retrofit the home just to make it fit would have been astronomical.
If your home is set up perfectly for a bladder, then it may be a different case for you, but for the average homeowner, try checking out one of the other options first.
$1 to $2 per gallon for bladder only
$5-$15 per gallon with Installation
Related: 12 Ways To Use Harvested Rainwater
7. Pumps & Pressure tanks
Now that you have the rainwater stored, you need a way to move it around. I use a combination Flojet Pump with a pressure tank. The pump is compatible with my off grid solar, but it can be a bit underpowered and loud.
You do not need a pressure tank with a Flojet Pump, but it helps from having to have the pump turn on every time you use water.
If you have the electrical capacity to handle more, you may want to get a bigger pump with more horsepower that can actually supply enough pressure when you need it.
Take into consideration voltage, and if the pump will work with your generator or solar battery, depending on what you use around your homestead.
Cost Summary:
Flojet Pump $200
Flotek Shallow Well Pump $200
Pressure Tank $250
8. Filters
After the pump come the filters. You will want to install at least two sediment filters at 30 micron and 15 micron, similar to this product on Amazon.
If you want to make the water drinkable, you will have to install additional filters such as a UV filter or Quantum Disinfection Filter.
A UV filter is the typical water purifier that most folks use to make their rainwater drinkable, but they take power. If you are off grid, the Quantum Disinfection purifier may be a better option for you.
Cost Summary:
Sediment Filters $150
UV Water Purifier $250
Quantum Disinfection Purifier $500
Costs for Rainwater Harvesting with Earthworks
Another way to harvest the rain is in the soil itself. By designing passive water harvesting systems such as swales, ponds, terraces or keyline design, one can store a lot more water on their property at a lower cost than water tanks.
The benefits are stopping soil erosion and reducing flooding, utilizing rain to the best potential for your plants and rejuvenating the soil and groundwater.
All costs with Earthworks are up-front initial costs, because there is almost no maintenance required, no pumps, tanks or anything to clean for years after. However, this water isn’t going to be used inside your home, it is only for your landscape, so it is not a solution for potable water.
Here your plants will act as pumps, to bring that water that you harvest in the soil back up to the surface in the form of fruits and vegetables. It is one of the best ways to make your landscape more drought resilient.
Cost Breakdown:
- Design, marking contours and other landscape-related costs – $500 – $5000
- Excavation equipment: I recommend that you rent your own for approximately $300 per day (including renter’s insurance).
- Manual labor is only feasible for Earthworks if you have a very small plot of land to create contours for, and that it has a natural slope already. In most cases, it is worth it to rent equipment and complete everything in a few days, with much less physical strain on you.
- Hiring an Equipment Operator – $1000 per day (if you’re not confident in your own driving skills for the equipment).
- Keyline plow – can usually be rented at $400 per day, and this is one of the most important tools for making contours with Earthworks.
- Mulch after Earthworks – Approx $5 per square yard.
Related: Off Grid Water Harvesting: How To Install Rainwater Catchment
Is Rainwater Harvesting A Good Investment?
The short answer is: yes!
The initial cost of a rainwater harvesting system can be recouped in as little as 5-7 years for smaller systems and up to 14 years for larger systems. In addition to having no more water bills, your property values may increase and your landscape will be more drought resistant.
Even if it did not recoup your initial investment, harvesting rainwater allows you to be independent from the grid.
In a current climate where municipal water sources are being contaminated such as in Flint, Mi, and now on Oahu in Hawaii, being in control of your own water supply may be the difference between life and death.