
Growing mushrooms at home can seem like a daunting task. Everything has to be controlled. Proper temperature and humidity is necessary. Keeping all your tools and materials sterile is also very important. Why even bother growing your own? Fortunately for us there are a few low tech methods that will work for anyone, even those of us less in tune to all the little details.
There are 4 different ways to easily grow mushrooms in the tropics. You can inoculate different logs with mushroom spawn, grow them out of buckets using wood chips, plant them directly into a garden bed or use a slightly more specialized method called the BRF technique.
These mushroom growing methods can be done by anyone at home. No special tools or climate controls are necessary. In just a few short weeks, you can begin harvesting your own home grown mushrooms.
Let’s dive into the various techniques so that you can start growing these tasty fungi in your own backyard.
Related: If you are looking to take your Mushroom growing to the next level, you’ll need a handy guide. I found 2 books that have helped me feel confident to grow my own, I am sure they’ll do the same for you.
THE ESSENTIAL GUIDE TO CULTIVATING MUSHROOMS
HOW TO GROW MUSHROOMS FROM SCRATCH
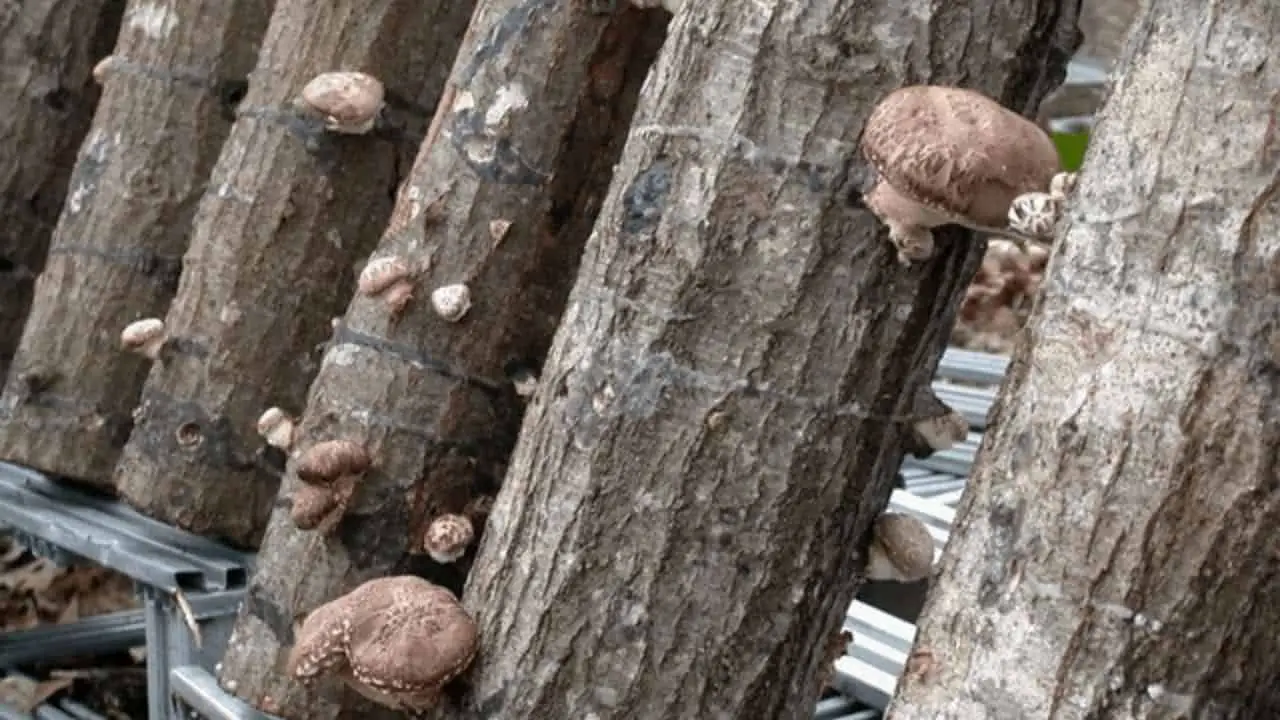
Growing Mushrooms on Logs
Let’s begin with the simplest way of growing mushrooms. Growing mushrooms on logs is by far the easiest way that you can grow your own at home. All you need are some logs, inoculated wooden dowels, a drill and some wax.
WHAT KIND OF WOOD TO USE
Different kinds of mushrooms require different kinds of wood to fruit on. There are numerous species of wood in the tropics that do a great job growing mushrooms. When in doubt, they mostly tend to be nitrogen fixing species, so if you are looking to experiment, start there.
Best Tree Species for Tropical Mushroom Cultivation
| Oyster/Shiitake Mushrooms | Chicken of the Woods Mushrooms |
| Ironwood (Casuarina equisetifolia) | Koa (Acacia Koa) |
| Albizia(Falcataria moluccana) | Eucalyptus (Eucalyptus grandis) |
| Gunpowder tree (Trema orientalis) |
Ironwood, Albizia and the Gunpowder tree have all proven to be good substrates to grow Oyster and Shiitake Mushrooms. The mushrooms grown on Ironwood were preferred in taste tests.
Wild Chicken of the Woods mushrooms have been found on Koa and Eucalyptus trees. Mixed results have been shown when trying to produce chicken of the woods at home without localized strain of mycelium. If you are a beginner, start by growing Shiitake or Oyster mushrooms.
INOCULATING LOGS
It is important to choose your logs from trees that are healthy and not diseased. If the tree looks sick, find another.
The diameter of your log can vary. Just keep in mind that the larger the diameter, the longer it will take for the spores to colonize and there for mushrooms to fruit, but once they do, they will fruit for a really long time. Just keep in mind how you’re going to move your logs around, if they’re too big you might kill your back.
| Ideal log size for cultivating mushrooms would be between 3 and 4 feet (up to 1.25m in length) and a diameter of 3 to 10 inches (8 to 25 cm.) |
Once you have your logs, you can begin to inoculate them. It is important that you wait no longer than one month from the time you cut your logs to the time you inoculate them. By waiting longer, you risk the chance of your logs becoming colonized with another species of mushroom that can outcompete the one you are trying to grow.
We will be inoculating our logs with wooden dowels colonized with the type of mushroom you wish to grow. You can purchase these products in Hawai’i from Mushroom Mitch on Maui and Volcano Mushrooms on Hawai’i Island.
Each 4ft log will require about 30-50 wooden dowels. You can use this formula to compute exactly how much you’ll need depending on the size of your log:
| Number of holes = (Length of the log x diameter of the log)/ 60 |
I like to start drilling a single line of holes down the length of my log about 6” apart and 1” deep using a 5/16” drill bit (be sure to check the diameter of your dowel to ensure size of drill bit, but 5/16” will usually do it).
The next row of holes will be about 3” from the first and staggered. Your holes should be in a triangle pattern. Continue doing this until you get all the way around your log. Once your holes are drilled you can insert the plug spawn.
The plugs should be able to go into the holes with just a light tapping from a hammer. Be sure they are flush with the outside of the log so that you can cover them with wax.
Covering your plugs spawn with wax will keep them from becoming contaminated by outside spores. Any wax will do, beeswax, candle wax, etc. Melt the wax and apply it to each hole with a brush or wax dauber. Make sure you cover each hole thoroughly.
STORE YOUR LOGS
When looking for a place to store your logs, you will want a location that is shaded, warm, moist and has good airflow. Sometimes this can be on the side of the house or underneath a large tree. You will find more success if you are on the wet side of the islands.
You can stack the logs like a log cabin, placing two parallel to each other, then two on top of those going the other direction and so on till you have a log tower. Or you can prop the bases up on cinder blocks and lean them in a sort of teepee fashion.
Just make sure each log gets good airflow. You don’t want to stack them like you would a cord of wood.
It will take 1-2 years for your logs to begin fruiting, but once they do they can produce mushrooms for 8 years or more! In the meantime, you’ll want to make sure your logs don’t dry out.
If it hasn’t rained much or you live in a drier environment, you will have to water down your logs every few days or so to ensure they remain moist. If your logs dry out, your mushrooms will die.
You can induce your logs to begin fruiting earlier by shocking them. Wait at least 6-9 months for your the mycelium to get a chance to colonize your log and then dunk them in cold water for 24hrs. This can be in a river, or a kiddie pool or a bathtub. Beats having to wait two years for it to happen naturally, but output might be less.
HARVEST TIME
I have noticed that mushrooms tend to fruit mostly during the winter months on the wet side of the islands, but fruiting times may vary depending on your location. Generally, a change in weather patterns from dry to wet or warm to cold will signal that it’s time to begin fruiting.
As your mushrooms begin to fruit, check on them regularly. They grow fast! Waiting too long and your mushroom may no longer be edible, plus you risk the invasion of mushroom pests that can destroy the rest of your crop.
Shiitake should be harvested before the caps open up, about 2-7 days. Oyster mushrooms should be harvested while there is still a curl in their shape, before the cap flattens out.
Related: 12 Best (Uncommon) Fruit Trees to Grow In Hawai’i
Growing Mushrooms in Buckets

Growing mushrooms on logs is the easiest way to grow mushrooms for the beginner, but growing them in buckets is not that much harder. Oyster mushrooms respond really well to this type of cultivation and would be the mushroom of choice for most tropical mushroom growers.
PREPARE YOUR MATERIALS
You will need the following items in order to grow mushrooms out of a bucket:
- 5 gallon bucket with lid
- Wood chips (preferably Ironwood or Albizia)
- Oyster Mushroom grain spawn
- ¼” drill bit
- Drill
First order of business is to soak the wood chips in a hot water bath for 24hrs. This helps pasteurize the wood chip and sterilize it from any unwanted spores. You can just use some hot water from the tap and a couple of pots of boiling water. It does not need to remain hot for the whole 24 hrs.
While the wood chips are pasteurizing, you can prep the bucket by drilling holes on the bottom and sides of buckets. The holes in the bottom will allow for drainage and the holes on the side allow for airflow and place for the mushrooms to develop from. The holes should be about 1” to 2” apart.
Do not worry about the small size of the holes, I have seen some very large mushroom clumps come out of a tiny ¼” hole.
INOCULATE THE BUCKET
Once the wood chips are ready you will want to drain the water. The wood chips should be moist, not drenched. Imagine squeezing a handful of chips in your hand and only be able to get a couple drops of water to drip. That’s how wet the wood chips should be.
Keeping cleanliness in mind, begin by putting a small layer of moist wood chips in the bottom of the bucket. Then take your spawn and sprinkle it on top of the wood chips, breaking up any clumps.
Add another layer of wood chips, then spawn and continue till the bucket is full, with a layer of wood chip as your final layer at the top. Put the lid on the bucket and it is ready to colonize.
Find a umid, shady spot to put your bucket for a little over 2 weeks to colonize. A garage or under a shady tree should work fine. Ensure that it is able to drain off without ruining anything valuable.
TIME FOR FRUITING
The mushroom bucket is ready for fruiting when the wood chips are covered in white mycelium. Hopefully this is the case for your bucket, if not you may have to wait a bit longer or make sure the wood chips are not dried out.
To induce fruiting all you have to do is move the bucket outside where the mushrooms can have more access to light. Ensure that the location that you move them to is humid and protected from drying winds. Partial shade is prefered over full sun.
Good practice is to spray the outside of the bucket, or growing mushrooms, once or twice a day on drier days to keep the mushrooms from drying out. You can also drape a bag over the mushrooms to maintain humidity, but be sure to let it breathe a couple of times a day.
The mushrooms should be ready to harvest in less than a week once placed outside for fruiting.
BRF Technique

MATERIALS
- Brown Rice Flour
- Vermiculite
- Perlite
- Mushroom Syringe
- ½ Pint Mason Jars
- Propagation tray and Dome
- Spray Bottle
- Large Pot for Boiling
METHOD
BRF technique stands for Brown Rice Flour Technique. This is a method for cultivating mushrooms indoors and is one of the fastest ways to grow mushrooms that I have found. It is a pretty low tech way to grow mushrooms so if it sounds difficult, it is not.
You begin by mixing Brown Rice Flour, Vermiculite and water ensuring that the mixture is moistened, not drowning in water, just like when we moisten the wood chips to grow mushrooms out of buckets.
Once moistened, stuff the mixture into a half pint, wide mouthed mason jar. Poke four small holes into the lid, just big enough for a syringe to inoculate the substrate, and place the lid on the jar.
The jars are then put into a cooking pot with water and set to boil. Steam for 90 minutes and then remove the jars from the pot and let them cool. You just sterilized your substrate.
Once cooled, inoculate your jars through the 4 small holes in the lid with your syringe filled with mushroom culture. It’s easy to pick up one of these syringes from an online seller such as Fungi Perfecti.
Great thing is, a single syringe can inoculate dozens of substrates. Then once the mushrooms grow you can culture off of those harvests and continue to grow more mushrooms, all off that single syringe!
Once inoculated, leave the jars in a cool, dark place for up to 2 weeks to allow the white mycelium to colonize the jar.
When the jars are fully inoculated, you can pop the substrate out of the jars and place them into a terrarium with a lot of holes drilled into it. The bottom of the terrarium should be lined with 5” or 6” of perlite on the bottom for humidity control and the whole thing should be spray misted once every other day.
The mushrooms should begin pinning in 1-2 weeks and fruiting within 3. You can expect up to 3-4 harvests from a single jar.
This is a great method to use for indoor mushroom growing. As you can see it does not take any fancy equipment nor does it take up too much space. It’s a great project to do with the kids and a great way to keep you supplied in high quality mushrooms for a fraction of the cost.
Growing Mushrooms in the Garden
One last technique for growing mushrooms is growing them directly in the garden. I learned this method while working at the Permaculture Skills Center in Sebastopol, CA. This method works great in Hawai’i becuase the mushroom that gets grown is the King Strophoria Mushroom, which grows well in temps from 60 to 90 degrees fahrenheit.
Start by soaking wood chips for 24hrs in a water bath. The wood chips should be made from Albizia, Ironwood or other woods listed above.
Once cold pasteurized you can build a garden bed with these wood chips. However big you want, Just be sure that your chip bed is about 4” to 6” deep.
Now take some grain spawn of King Strophoria mushroom and sprinkle it into the bed of wood chips. Mix it in a little, keep moist for several months and when the time is right, you’ll find giant King Strophoria mushrooms popping right out of the ground.
This method is really easy for growing mushrooms.
Related: Creating A Food Forest In Hawai’i
Mushroom Pests
Growing mushrooms still comes with its share of pests and diseases to ensure your failure. The most wicked of all the pests tend to be the sciarid fly. This insect can turn a great looking harvest to junk in less than a day.
To combat this problem, many mushroom growers in Hawai’i stick with a seasonal approach. The flies are more active in the summer, so it makes sense to grow the mushrooms out over the winter months. This works well for us because the winter months are when the mushrooms want to fruit naturally.
If you have a major pest issue, try sticking with Shiitake mushrooms. They are the most resilient mushroom to attack from pests.
Other diseases and pests may show themselves, but as long as you follow proper procedure, try to sterilize as much as you can and grow during the right season, you should find that your mushrooms are relatively pest free.
RESOURCES
- https://reeis.usda.gov/web/crisprojectpages/0194051-growing-tropical-edible-mushrooms-on-waste-wood-products.html
- https://hilo.hawaii.edu/nihopeku/2015/02/20/how-to-grow-your-own-edible-mushrooms/
Homesteadinhawaii.com is a participant in the Amazon Services LLC Associates Program, an affiliate advertising program designed to provide a means for sites to earn advertising fees by advertising and linking to Amazon.com. This site also participates in other affiliate programs and is compensated for referring traffic and business to these companies.